10 min to read
When implementing change to your website, you are probably either using programs such as Optimizely, or you are outsourcing a website designer.
Well, if you haven’t heard already, Google has changed the game by releasing their split testing and personalisation platform, Google Optimize.
What is Google Optimize?
Google Optimize is a tool that helps you add value to your customers’ user experience when using your website.
Google achieves this through collecting and measuring data on customer engagement with the different variants of your website. Your website variants can range from something as simple as changing your product description, to something as complex as completely redesigning your homepage.
Once Google has gathered all the data, you can make an informed decision on which website variant will be most effective in achieving your goals. With the help of Google Optimize you will be able to implement efficacious solutions.
The Importance of Testing
Testing before implementing change is a pivotal stage of any creation process.
This can be said for any aspect of business, from creating physical goods to changing the design of your website. The fundamental reasons for testing are the same.
However, even the biggest companies in the world sometimes neglect the testing stage in the creation process.
A prime example of this is Coca Cola in 2003. The company introduced their own brand of water, called Dasani. They thought that the same formula they sell in the US; purified tap water, would sell with the same success in the UK.
The UK market are familiar with bottled water from natural springs so when Coco Cola’s secret ‘formula’ was published in the media they suffered national embarrassment and had to take Dasani off the shelves after just five weeks! Mistakes were even made in their online marketing campaign with slogan’s such as “Bottled spunk” and “Can’t live without spunk”. This wording had proven effective with the US audience however this sort of language raised a few eyebrows in the UK. The result of this product launch left a few of Coca Cola’s chiefs red-faced as they were mocked by the media and even by their suppliers.
So how does this relate to you testing changes on your website?
This case study highlights the fact that people’s tastes vary substantially and what works for one target market doesn’t necessarily work for another.
Secondly, this case study illustrates the importance of language on your website. You can’t assume that just because you understand it, everybody else will or because something has worked well in the past that it will work well again.
These are the two main reasons we give to clients when they ask us “Why do we need to spend so much time testing our solutions before implementing them?”
The Coca Cola case study also highlights the consequences of not testing as you may incur higher costs and also miss out on an opportunity to increase conversions, or your click-through rate.
Therefore, if you make changes solely on assumptions and past experiences, then you run a high risk of alienating a proportion of your target audience.
What should I be testing?
Text
- Language – as highlighted in the case study, the language that you use in your written content must be tested to avoid any mistranslations.
Typography
- Fonts - you have to choose which font style is easiest to read and fits with your branding.
Tip: Sans Serif fonts work best on webpages (e.g. Arial) due to its consistent width and plainness.
- Font size – it is vital to test the different sizes of your font to see how customers engage with the text and the differences in click-through rates.
- Colours – Different colours elicit different emotions; therefore, this must be tested for the areas of your website that you want to grab the attention of users.
Tip: when it comes to product descriptions or blog content the general rule of thumb is to use dark colours on a white background.
Call to Action
- Text – First and foremost you need to make sure you use the correct wording. It must be simple and synonymous with the action you wish your audience to take. E.g. “Buy Now” or “Read More”.
Tip: it is proven that by creating a sense of urgency for your call to action; for example, “limited edition”, increases click-through rate.
- Colours – you need to test the colours to see which one best fits with your website design and induces clicks.
- Position – the position of your call to action should be where your customer’s eyes are drawn to after reading your webpage. For example, next to the picture of your product.However, you should not take this for granted as your customers may read content in different ways. You need to test every position to make sure you’re not missing out on those clicks!
Media
- Images – Images are useful for catching a customer’s attention, therefore you need to make sure you test different images so they correspond with the text and the design of your website.
- Videos – The strength of video is growing every day. If you aren’t using video yet then you may want to think about using it. You need to measure how customers engage with different videos on your website.
For more information on the power of video content read our articles on YouTube Analytics and Facebook Cover Videos.
So what makes Google Optimize stand out from the rest?
The Google Optimize Visual Editor
One nifty feature on Google Optimize is that you can create your own designs for your webpage without any knowledge of coding using the Visual Editor.
You can also use the Mobile Web Editor to edit and preview what your website will look like on different devices.
This allows you to implement a seamless customer experience across devices.
Google integrations
Google have worked over the years to streamline their analytical tools to aid digital marketers and companies whom are looking to improve their digital presence.
The main two platforms we work with are: Adwords and Analytics.
This means that by linking your Google Optimize account with your Analytics account you will be able to identify which areas of your website need improvement, evaluate your experiments against your business objectives, and determine which experiment has the greatest effect on user behaviour and conversion rates.
Google has also recently integrated Optimize with AdWords. AdWords helps you to create numerous adverts and decipher which one performs best. The integration with Optimize now takes this one step further and allows you to create, modify and test your landing pages based on a campaign, ad group, or keyword connected to your ad.
Again, Google will deal with all the annoying query parameters and destination URLs!
The differences between Google Optimize and Optimize 360
There are two versions of the Google Optimize platform; a free version and a paid version. T
he paid version will cost an enterprise around $150,000 per year. I say enterprise instead of business because Google have designed optimize 360 to target the enterprise level, while the free version targets small to medium sized businesses.
So what are the specific differences between the two?
|
|
Optimize | Optimize 360 |
| Made for... | Small to medium-sized businesses getting started with experimentation. | Larger enterprises and businesses with more sophisticated testing needs. |
| A/B testing | √ | √ |
| Native Google Analytics integration | √ | √ |
| Basic URL targeting | √ | √ |
| User behavior and technology targeting | √ | √ |
| Geo targeting | √ | √ |
| Technical targeting (JavaScript, cookies, data layer) | √ | √ |
| Google Analytics Audience targeting | – | √ |
| Web app support | √ | √ |
| Multivariate testing (MVT) | Up to 16 combinations. | Up to 36 combinations. |
| Experiment objectives | Up to 3 preconfigured. | Up to 10 preconfigured, additional available once started. |
| Simultaneous experiments | Up to 3. | More than 100*. |
| Administration | Basic administration with unlimited users. | Analytics 360 Suite administration. |
| Implementation services | – | √ |
| Support and services | Self-service help center and community forum Certified partners. | Enterprise-level service, support, and SLAs |
| Payment options | Free. | Invoiced monthly. |
Key Points
- With the free version you are restricted to 3 tests at once.
- Multivariate testing is also restricted to a maximum of 16 combinations.
- You do not have access to analytics audience targeting, this is a feature that allows you to specifically target high-value customers with exclusive offers.
- Finally, Optimize has preconfigured goals in which you can only apply 3 per experiment.
Step-by-step guide to using Google optimize
Step 1: Sign up
Go to optimize.google.com
- Click on ‘Sign Up’ for free.
- Click ‘Get Started’.
- Tick the boxes if you wish Google to contact you. We recommend that you tick the boxes to get updates on Optimize's new features as Google is constantly looking for ways to improve their services.
- Choose account settings; it is recommended to leave all of them ticked.
- Click ‘Done’.
Step 2: Create an Account
Click on the ‘Create Account’ button. Keep all the boxes ticked as this shares your data with Google. This allows them to give you assistance and further develop their products.
Then click 'Next'.
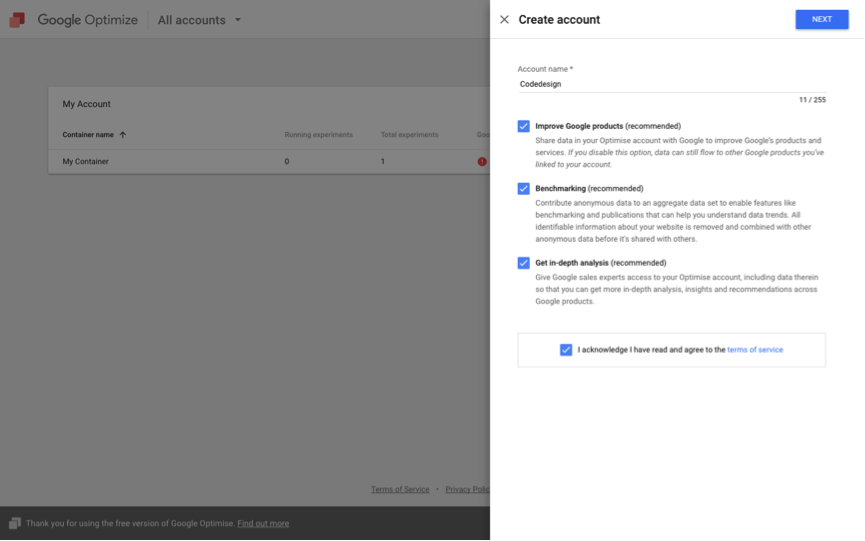
As you and your company are the only entities that will be viewing your Optimize account you can name it anything you like. However, to make it easier we just use our company name.
Step 3: Create a Container
You are almost ready to create experiments.
You just need to create a folder to contain them, hence the name ‘container’. 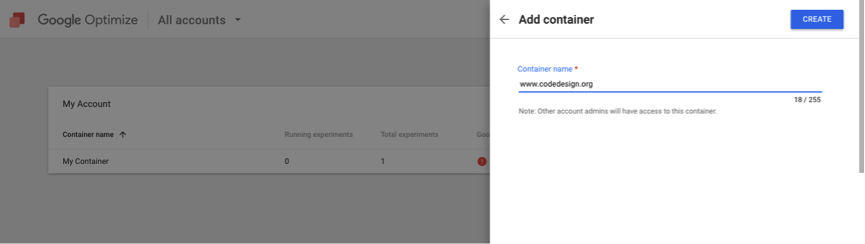
Again, you have free reign over your container name, but for reasons of simplicity use your websites domain name when naming your container.
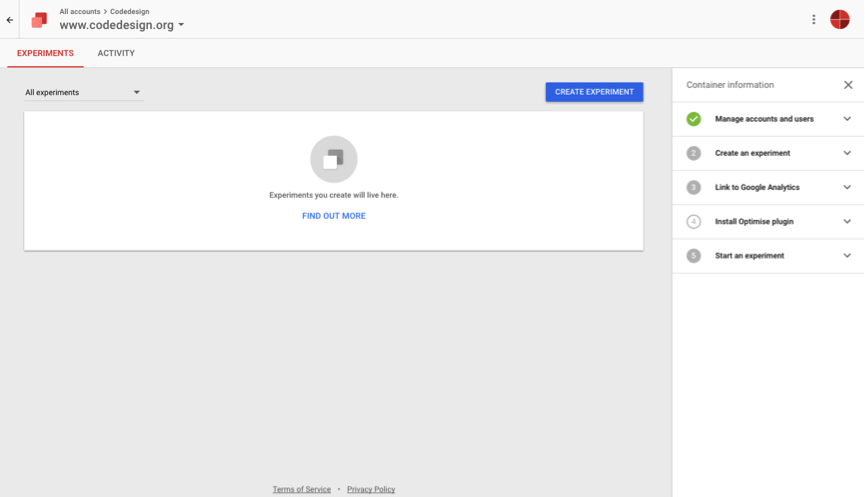
Your container page will look like this.
As you can see down the right hand side you have a checklist that expands to give you more information. Google will have completed “manage accounts and users” for you.
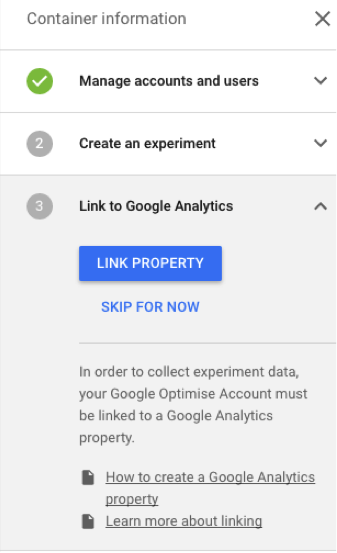
Step 4: Link your Optimize with your Analytics
As you can probably tell by now, data is the running theme of our Codedesign blog posts, and this post is no different.
By linking your Analytics account to your Optimize account you can make your website design truly data-driven. Optimize will prompt you to create an experiment before completing this step, however you should make sure you link your analytics account first!
Click on the blue ‘Link Property’ button.
This will then take you to the page shown below where you need to select the property you wish to link.
Select your Google Analytics account for the website that you are making changes to. 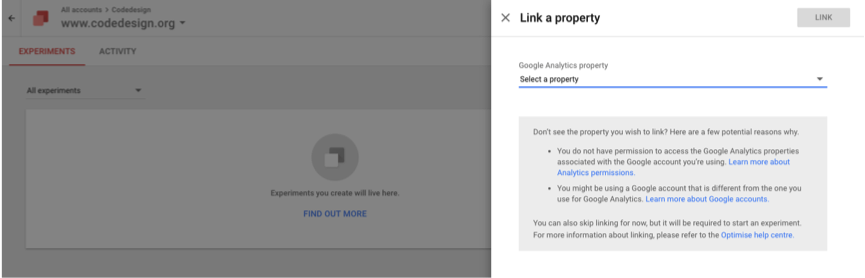
From here you will need to install the Google Optimize Snippet on to your site. Incidentally this is the next step on Optimize.
Step 5: Installation of the Google Optimize Snippet
Firstly, you need to scroll down the checklist on the right hand side and go to ‘Install Optimise Plugin’.
From here click on the blue ‘View Plugin’ button. 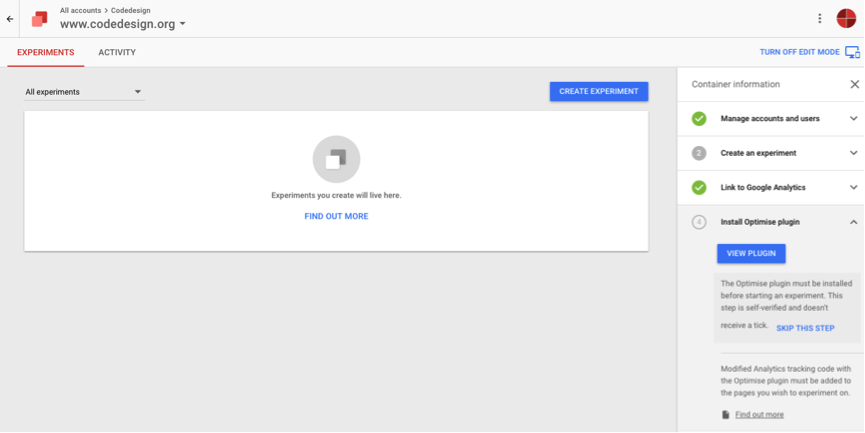
Google will then show you your Optimise tag with steps on how to implement it. 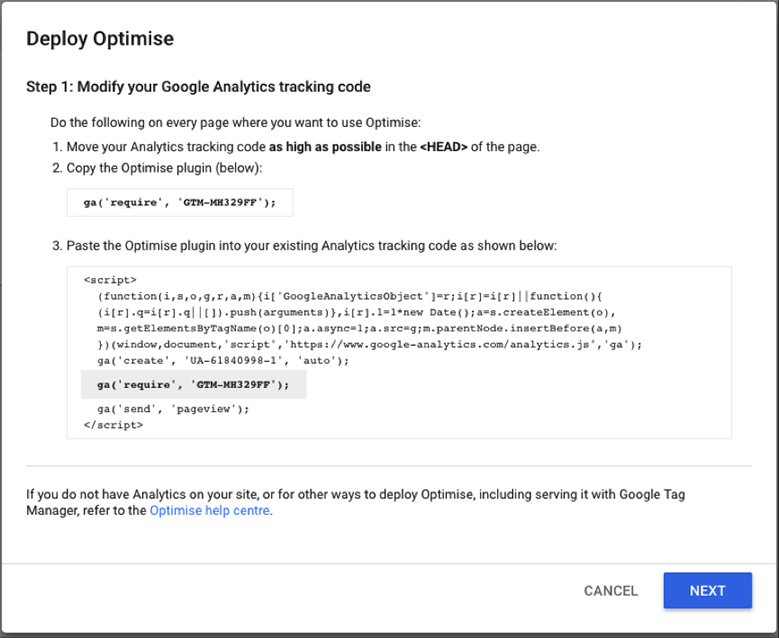
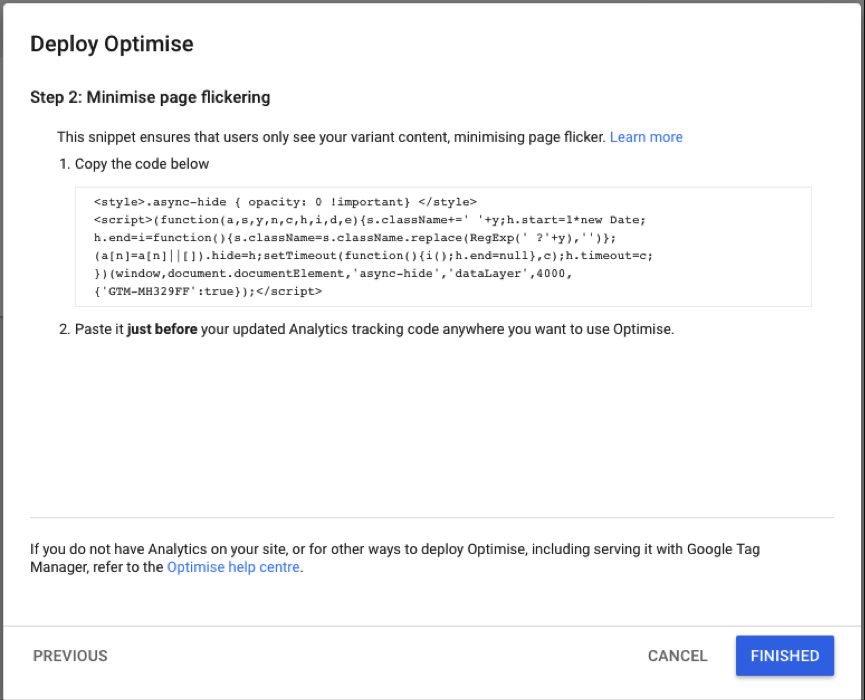
Step 6: Inputting the Optimize snippet code onto your website
Google gives you instructions, telling you that the snippet code should be implemented in the Section of the page.
The process will depend on the CMS (Content management system) or the framework you are using it.
Below we will show you how to do it on Wordpress.
Installing Google Optimize Snippet on Wordpress
There are several ways to input this code into Wordpress.
You can install it through Header.php Apprearance>Editor>Header.php Or installing a Wordpress plugin like insert headers and footers link Settings > Headers and footers scripts
Tip: Remove or comment (to deactivate), the Google Analytics pageview code line to eliminate the possibility of counting twice the pageviews.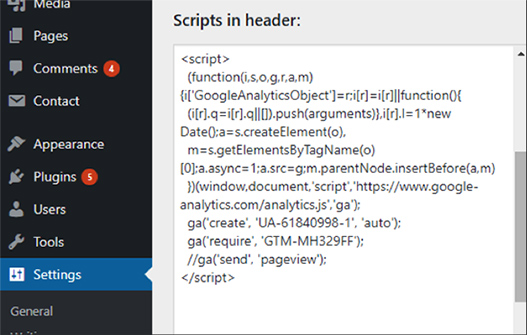
There are many different ways to install Google optimize snippet onto your website.
Click here to read another article that puts forward another method for inputting the code onto your website.
You can also use Google Tag Manager to install the snippet onto your pages.
Step 7: Create your First Experiment
Click the blue 'Create Experiment' button and name your experiment.
I want to test two versions of our ‘What We Do’ descriptions on our website therefore this is the name of my experiment. Then copy and paste the URL of your editor page; the page you wish to test.
So I have used the URL for the home page of the Codedesign website. 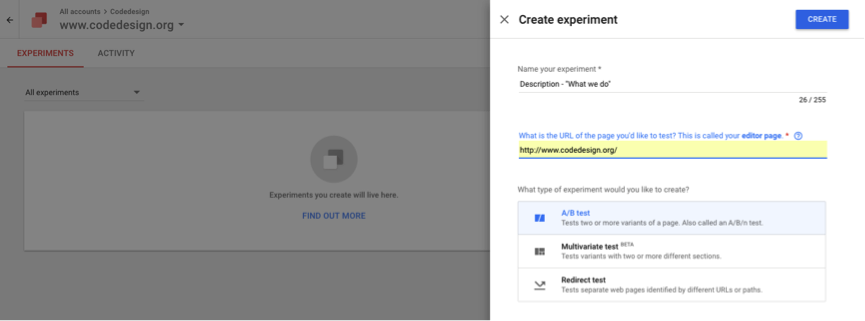
Before clicking ‘Create’, you need to decide which test best suits your pages/contents goals.
So what does each test entail?
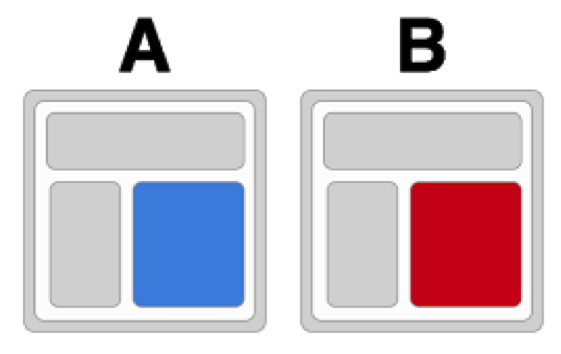
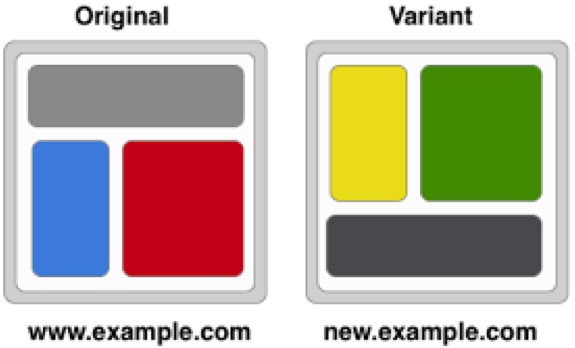
A/B Test
This is where you test two or more variants to see which performs better. So in layman’s terms you are testing the original version against a new version(s) of the part of the same page. For example a description or a website heading.
A/B testing illustration
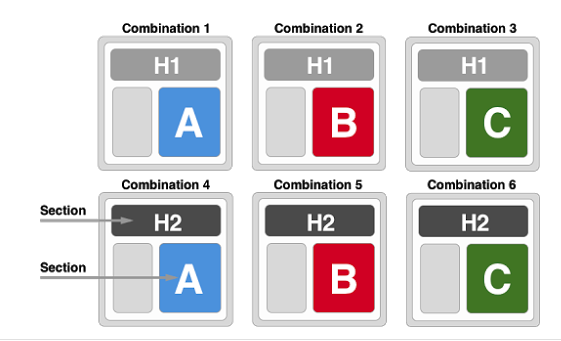
Multivariate Test
This test is used when you want to change and test multiple areas of your page at the same time. You can test different combinations of variants to see which combination performs best.
Multivariate Testing Illustration
Redirect Test
This is very similar to A/B testing, however instead of testing two different variations of your home page you are testing two completely separate URL’s.
Therefore, you could have two completely different pages all together.
Redirect Testing Illustration
Tip: Redirect testing is useful when testing two or more landing page designs against each other to see which performs the best. Working example: As I am modifying a description I shall use a simple A/B test to see which of the two descriptions generates the most clicks on my buttons below. These buttons lead to more information on our services.
Step 8: Create a Variant
Firstly you will need to download the Google Chrome extension ‘Google Optimize’ so that you can access the visual editor.
Click on “+ New Variant”, name your variant which should bring you to a page looking like this:- 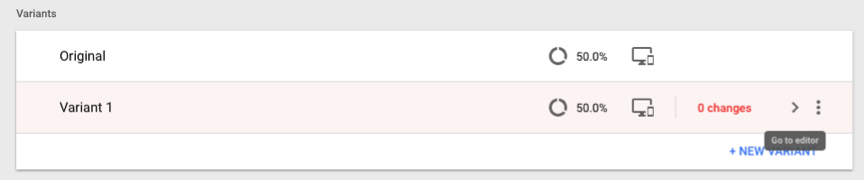
From here click on the ‘>’ button to go to Visual Editor on your website page, as seen below. 
Google has created a straight forward ‘How to Use Visual Editor’ guide to help you understand all the features.
Step 9: Configuration
The final step before you can create your experiment is to set your experiment objects and configure your targeting.
These objectives are either from a preset list on Google Optimize or from the goals you have set on your Analytics account.
Don’t forget that you can only choose one primary objective and two secondary objectives. All of which cannot be changed once you have started your experiment so choose wisely!
My two objectives are to increase ‘Page Views’ and ‘Session Duration’. As this is a marketing activity we must put a brief description on what we are testing and set a hypothesis. The hypothesis is what you think the result of your experiment will be. 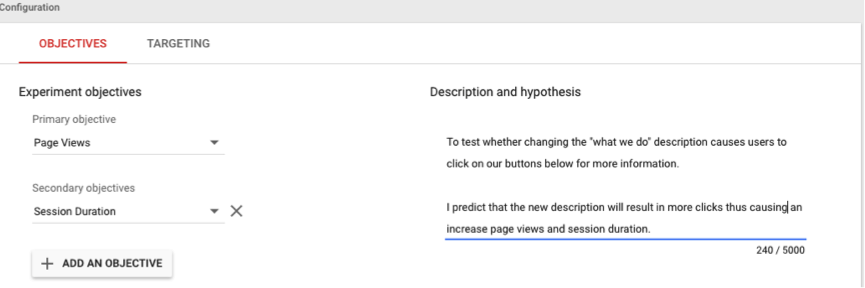
With Targeting you can decide what percentage of your visitors and the weight of visitors that you wish to target. For example 40% of visitors see the original page and 60% of visitors see the page you are testing.
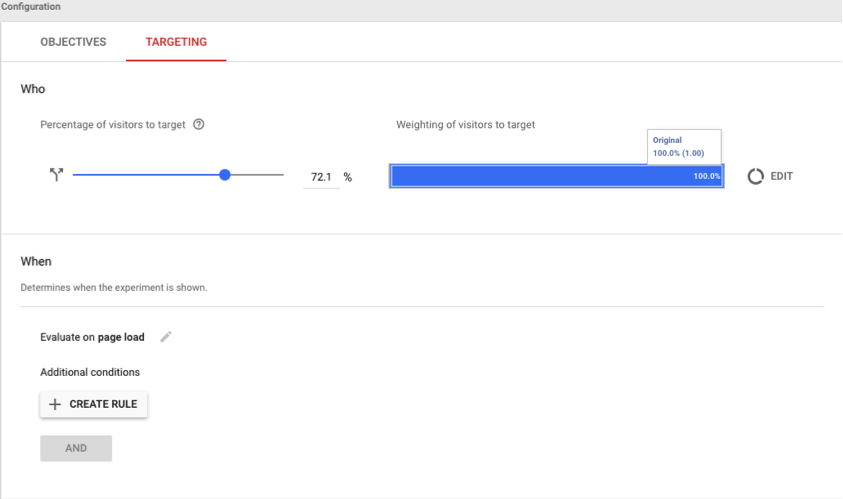
With the ‘When’ setting you can set rules for when your test shows up.
For example you can set a rule for the test to only show up when somebody from Manchester, UK is on your page. 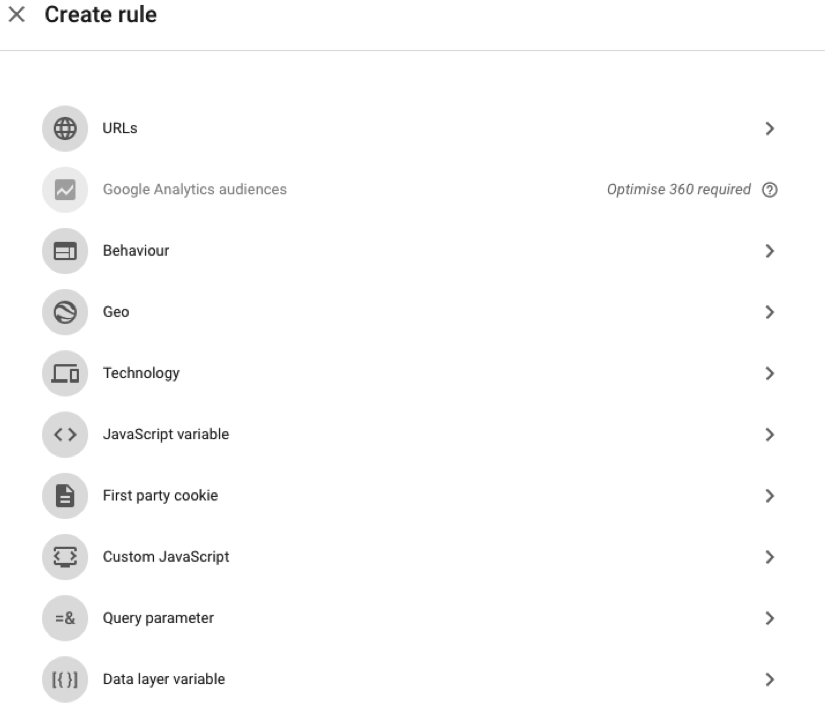
Brief description of each rule
- URL’s – Target the specific URLs where your experiments run.
- Audience targeting – Target Audiences created in Google Analytics.
- Behavior targeting - Target new vs. returning visitors or those coming from specific referrers.
- Geo targeting – Target visitors from a specific city, metro, region or country.
- Technology targeting - Target visitors using a specific device, browser or OS.
- JavaScript variable – Target a JavaScript variable in the source code of the webpage.
- First-party cookie – Target users that have a first-party cookie from your website.
- Custom JavaScript – Target pages based upon a value returned by customer JavaScript.
- Query Parameter – Target specific pages and sets of pages.
- Data Layer variable – Target based on key values stored in the data layer.
Final Thoughts
Overall Google Optimize is a very useful tool for companies that are looking to improve how their customers engage with their website through testing out new variants. It is straightforward, easy to use and has loads of awesome features such as the Visual Editor.
NEED SOME HELP TO OPTIMIZE YOUR WEBSITE?

Add comment ×